Getting Started
Introduction
Rebirth of the Night introduces new and unique concepts, different to Vanilla Minecraft.
Scroll of New Life
This scroll is placed into you hotbar as soon as you spawn into a new world. This scroll will set your world spawn as soon as you right-click with the scroll in your hand. It is to note that there is no way to get another one of these and is unobtainable after that! (except if you have cheats)
JEI
It is good practice to always check JEI for recipes and descriptions before referring to this wiki.
On the bottom-right of the inventory screen there is a search bar, similar to the one found in Vanilla creative mode. Use this to search for desired information about items/blocks. You can select the search results on the right-hand side to expand any information.
Version 3.0
Chopping wood
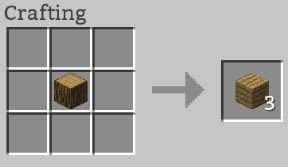
In version 3.0 and later, punching trees is no longer an effective way of harvesting wood. You can instead create the crude axe for felling trees and creating planks. Planks are created by either chopping logs with an axe or normally in a crafting table.
To chop logs into planks, simply place the log block down and right-click with your axe equipped. The first chop removes the bark, resulting in bark and a stripped log. Futher chopping the debarked log will drop planks.
Mining stone
The first pickaxe you can naturally obtain is the stone pickaxe, which can be crafted with either flint or cobblestone via the 3x3 crafting table.
Tools, especially pickaxes, have different harvest levels and mining speeds. This is the same concept as in Vanilla Minecraft. See the Tool Comparison Chart.
Earlier versions
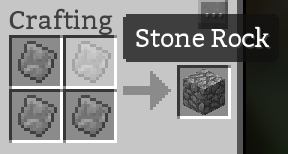
Just like in version 3.0, stone tools can be made with cobblestone. Cobblestone can be created with four rocks on a 2x2 grid. Cobblestone can be used with sticks to make stone tools like in regular Vanilla mincraft, it also does not matter which variation of cobble you use.
The First Day - Making a base
Options
You have about 20 minutes to prepare before the first night approaches. Before that happens, it is greatly advised to be on the lookout for good base locations. Remember, mobs will breach your base if it's not in a good location. You should create an initial wall around your base that's at least 10 or so blocks away from the base. Make sure you put torches on the inside, too. When night approaches, steer clear of the walls and stay close to the center.
Often a good early base makes use of the environment around it. For example, Grassland biomes may spawn with "domes" - large hills with carved-out caverns, exposed to the surface. They have enough light in the daytime, but also put a roof over your head and one or two stone walls to watch your back. Another place with unexpected defenses are the more swampy biomes, such as wetlands and bayous. While not every instance will have this, small-to-medium sized islands can spawn, with trees for lumber and lily-pad filled water all around. This makes for easy defense: since most land mobs can't travel across lily pads, you only need to worry about lighting up the island itself. These places also have plenty of water for agriculture later on.
Alternatively, if you are able to travel far enough in your first twenty minutes, you may come across a fully-functioning town that has not been overrun with bandits1. Unfortunately, it can be difficult to get outside of the ruins range before the first night falls. If you happen to come across a snowy biome, be on the lookout for Reindeer: they are a great boon, as they can help you travel quickly, especially for before your first night.
Another option is to create an underground base. If you dig far enough down, mobs won't sense you in your base. Just be careful for caves that may be near your base, as the mobs may dig through your walls.
If you've done any of these options, you should be safe for your first night.
You can then start looking at options to expand your settlement.
Starting Dangers
If you choose to live on a mountain or hill, be careful of harpies, which spawn on mountains and other high places. These humanoid birds can pick you up and drop you at deadly heights, so smack them as soon as you can if you fall in their clutches.
If you choose to live in a swampy biome (or temperate rainforest) be careful of Stymphalian Birds, which spawn in low-lying, moist regions. These bronze birds shoot out dagger-like feathers from the air, making them hard to defeat without a bow or long weapon. In addition to these nasty birds, swampier biomes also have lurking underwater threats. Eels, lampreys, pirañas, and Frenzies can spawn in the water, waiting to chomp down on the unsuspecting traveler. While most of these deal minute damage, Frenzies can easily kill you if unprepared and/or surprised.
The beaches are not immune to nasties either: Cyclops home can spawn by the shore, and nearby coastal rocks may spawn with alluring sirens that can drag you to your doom. On rare occasions, giant sea serpents can rise from the depth and decimate anything near the water. As a result, one should be wary of walking along the coastline in search of a better home.
Additional Tips
It is recommended you don't put torches around the entrance of your base until you have enough gear to fight, as zombies investigate light sources, and will alert other zombies if they notice something suspicious. For example, the entrance to an underground base from the surface should not have torches. Another thing to possibly pay attention to is how much noise you are making. Placing blocks and mining will cause nearby mobs to investigate the area. However, this usually isn't a big deal unless you're detonating TNT, or a creeper explodes.


